Welcome to Zoho Mail: Your Transition Manual
This manual is your friendly guide to getting the most out out of Zoho Mail after migrating from other mail providers, such as Office 365 Outlook or Google GMail. Zoho Mail is designed to provide a secure, ad-free, and highly customisable email experience, integrated with a suite of productivity tools that can streamline your daily work. We'll walk you through the user experience, customisation options, essential features, and powerful integrations to help you settle in and boost your productivity.
Note that this is not an exhaustive user guide - for that we refer to https://www.zoho.com/mail/help/webmail-interface.html
Chapter 1: Your New User Experience in Zoho Mail
Moving to a new email platform can feel a bit like moving house, but Zoho Mail aims to make it a smooth transition. You'll find a clean, intuitive interface that puts your communications front and centre.
1.1 A Fresh, Distraction-Free Inbox
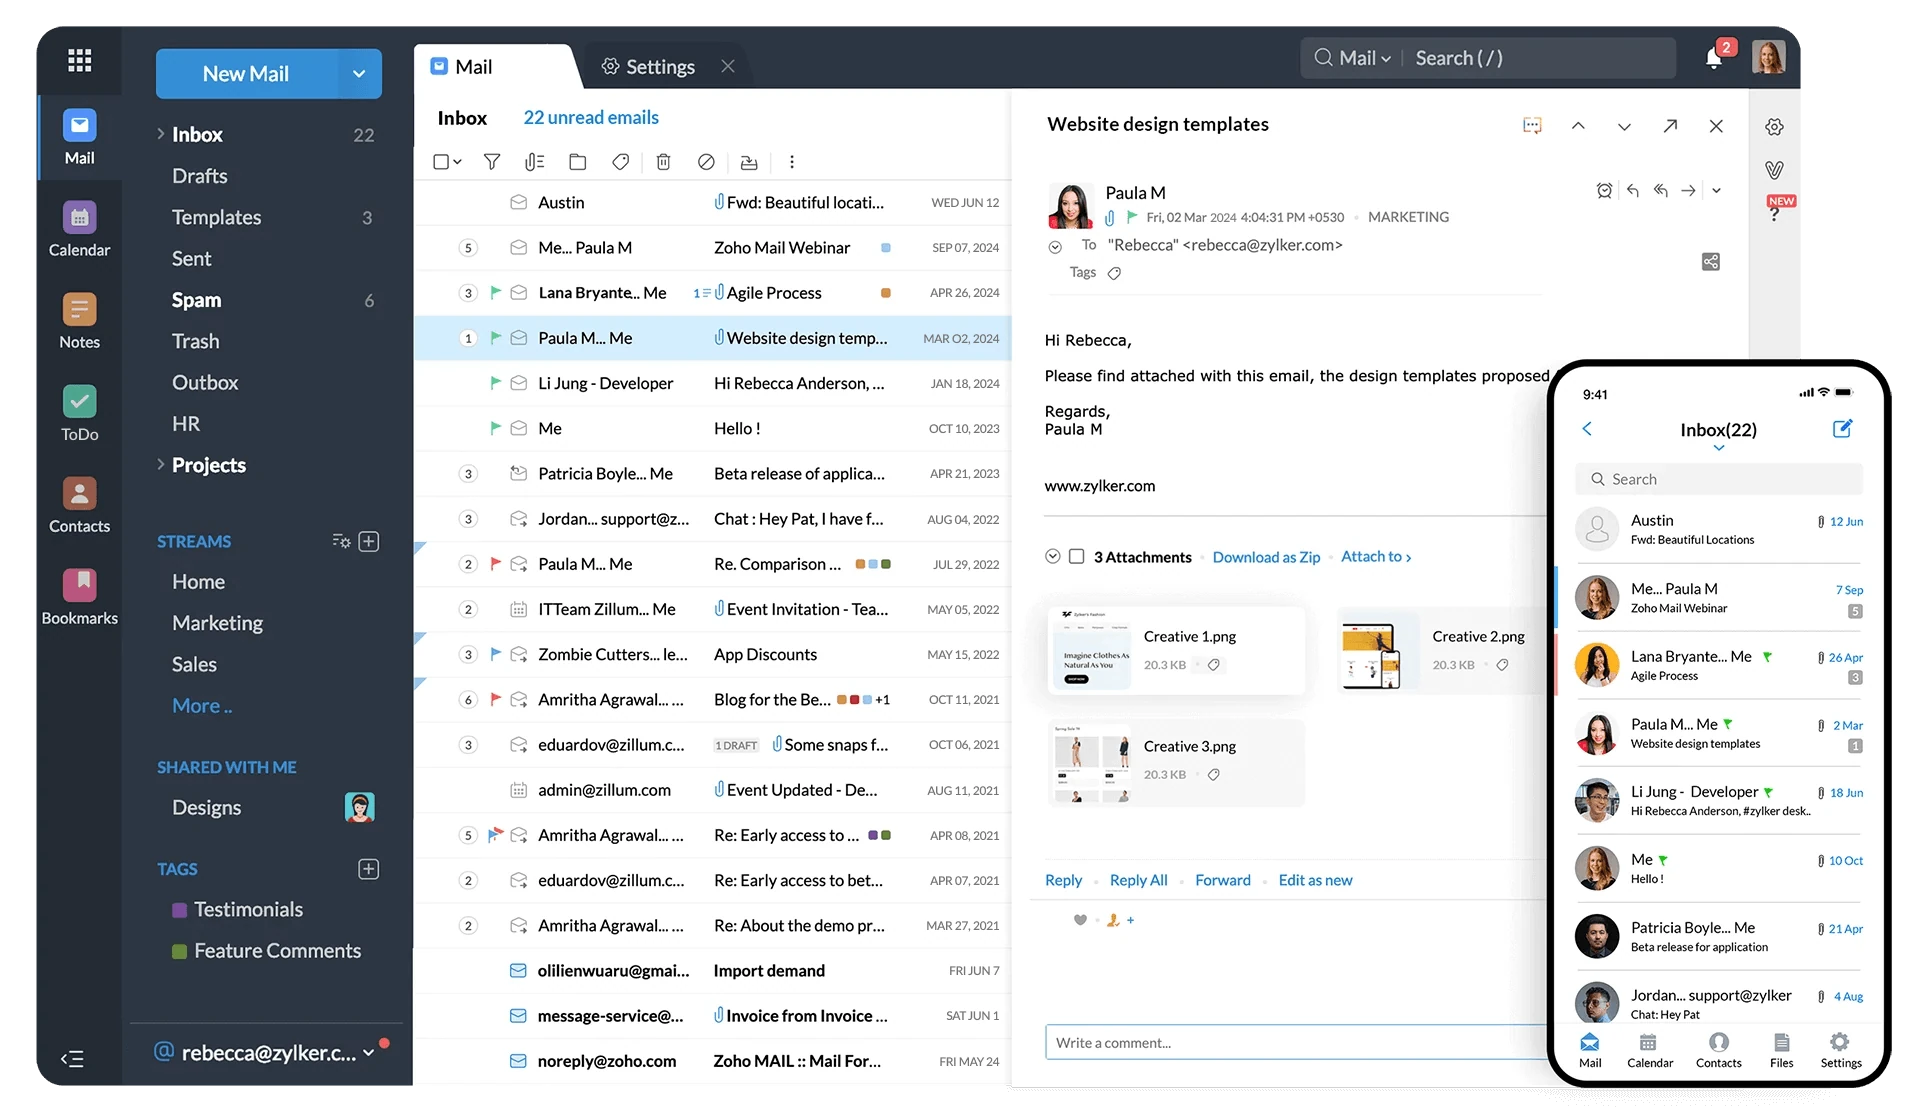
One of the first things you'll notice is that your Zoho Mail inbox is completely distraction-free. This means no distracting advertisements, allowing you to focus purely on your emails and tasks. The user interface is designed for simplicity and efficiency, which many users appreciate.
1.2 Conversation View
Zoho Mail organises email responses into single conversation threads, with the newest email appearing at the top
. This "Conversation View" helps keep your inbox tidy and provides all the context you need for longer email discussions. If you prefer to see individual emails unthreaded, you can easily turn off Conversation View in the app's settings.
1.3 Zoho Mail on the Go: Mobile Accessibility
Zoho Mail offers dedicated mobile apps for both iOS and Android devices, extending your email and productivity tools to wherever you are.
• Unified Inbox: Manage all your Zoho accounts from one unified inbox, receiving push notifications for each.
• Quick Swipe Actions: Swiftly delete, move, or archive messages with simple left swipes.
• Integrated Suite: Beyond email, the mobile app includes your calendar, contacts, and files, making it a complete productivity suite.
• Attachment Viewer: View attachments as thumbnails for easy navigation, similar to your phone's photo gallery.
• Powerful Search: Find elusive emails using criteria-based search fields, even if you only vaguely remember details.
• Offline Access: Browse, compose, and respond to emails even without an internet connection.
• Apple Pencil & 3D Touch (iOS): Get creative with handwritten messages using Apple Pencil's Scribble, or quickly peek at emails and access quick actions (Compose, Add Event/Contact, Search) with 3D Touch.
• Apple Watch Support: Receive notifications directly on your wrist, allowing you to see sender and subject, read snippets, and even reply using voice commands.
• Landscape View: For those who prefer typing or reading on a wider screen, the app supports landscape view on iPhones, iPads, and Android tablets.
1.4 The Trident Desktop App: Your Unified Workplace Companion
For desktop users, the Zoho Trident app offers an all-in-one experience, securely combining email, chat, calls, calendar, tasks, notes, and more into a single native application for macOS and Windows.
• Multiple Inboxes: Access multiple Zoho Mail inboxes simultaneously without constant logging in and out.
• Offline Mode: View and draft emails even when you're not connected.
• Unified Calendar: Organise your day, track meetings, and manage appointments across multiple time zones from one place.
• Tasks & Notes: Manage personal and group tasks, and jot down ideas in colour-coded notes.
• Security Features: Includes App Lock (to automatically lock the app after inactivity) and data encryption (for data at rest and in transit).
• Smart Features: Smart Mail displays actionable data from other Zoho apps directly in notification emails; Smart Flow allows seamless drag-and-drop of data between modules; and Smart Assistant lets you execute commands using natural language.
Chapter 2: Customising Your Zoho Mail Experience
Zoho Mail provides several ways to personalise your environment to suit your preferences and workflow, whether you're using the web interface or the Trident desktop app.
2.1 Themes and Visuals
In the Trident desktop app, you can personalise the app's appearance with light, dark, or system themes and choose accent colours. For the web interface, you can typically change themes and organise emails into folders and labels for a personalised experience.
2.2 Mail View Options
When viewing your email listing, you have several choices:
• Email Listing View: Choose between Classic View or Compact View.
• Open Message In: Decide whether clicking an email opens it in a preview, as a new tab, or a new window.
• Show Message With: Select to display only the Subject or both the Subject and Summary in the email listing.
• Conversation View: As mentioned, you can turn this on or off to group emails into threads or view them individually.
Chapter 3: Mastering Your Mailbox with Filters and Tags
Efficiently managing your inbox is crucial for productivity. Zoho Mail offers powerful tools like filters and tags to help you organise, prioritise, and locate your emails with ease.
3.1 Creating and Managing Filters
Filters automate actions on incoming emails, helping you avoid manually sorting your mail
. You can use them to move emails to specific folders, apply tags, mark as read, forward to other addresses, and much more.
To set up a new filter:
1. Log in to Zoho Mail.
2. Click the Settings icon (usually a gear icon).
3. Go to Filters and select the New Filter option.
4. In the Create Filter dialogue box, provide a Name for your filter.
5. Define the conditions and criteria (e.g., From, Subject, Contains specific words) that an email must meet.
6. Choose the action to be performed (e.g., Move to Folder, Apply Tag, Mark as Read, Forward to).
7. Click Save.
Emails matching your criteria will automatically be processed according to your filter rules
3.2 Using Tags to Categorise Emails
Tags allow you to categorise emails with different colours and names, offering a flexible way to organise your inbox alongside folders
. You can apply multiple tags to a single email.
To create and apply a new tag:
1. Click the plus icon (+) next to the Tags listing in your left pane to create a custom tag with a name and colour of your choice.
2. Select the relevant email(s) from your inbox using the checkbox next to them.
3. Click on the Tag as icon at the top of the listing.
4. Choose the corresponding tag from the drop-down. You can also create a new tag on the fly.
You can also flag important emails for easier access. Hover over an email in the listing and click the Flag icon to flag it. All flagged emails appear under the Flagged view in the left pane.
3.3 Organising Emails into Folders
Folders are a traditional way to organise your emails manually.
To create a custom folder and move emails:
1. Click the plus icon (+) next to the Folders listing in your left pane and give your new folder a name.
2. Select the email(s) you want to move using the checkbox next to them.
3. Click on the Move to icon at the top of the listing.
4. Choose your desired folder from the drop-down menu.
You can also create a new folder from this menu. The selected emails will then be moved to the chosen folder.
3.4 Searching Your Emails
Zoho Mail's powerful search functionality allows you to find emails across all your applications, including Notes and Tasks
. You can search using various criteria and combinations to narrow down results.
• Criteria: Search by From, To/CC, In folder, Tag, Contains (keywords in content), Subject, Attachment Name, etc.
• Search History: Quickly reuse previous search parameter combinations.
• Quick Access: Easily locate specific sections within Settings.
Chapter 4: Composing, Sending, and Advanced Email Features
Crafting and sending emails in Zoho Mail is straightforward, with several advanced features to enhance your communication efficiency and security.
4.1 Composing a New Email
1. Log in to Zoho Mail.
2. Click on the New Mail button in the left pane of your Mailbox. The Zoho Mail Composer will open.
3. Enter the recipient details in the To, CC, and BCC fields. Zoho Mail integrates with your contacts for auto-filling addresses.
4. Add a clear Subject.
5. Type your email content. Use the rich formatting options in the Composer to apply bold, italics, underlining, change fonts, adjust alignment, add lists, and insert links or images.
6. Once drafted, click the Send button.
The email will be sent and stored in your Sent folder.
4.2 Using Template Emails
For emails you send regularly, templates can save you a significant amount of time and ensure consistent messaging. You can create reusable drafts for common scenarios like follow-up emails, client updates, or internal announcements. Zoho Mail will offer AI-generated email content as a future development, further simplifying this process. For AI, the organisation must have AI enabled via OpenAI platform API key.
To create a template from your draft email, simply save it as a template. This can be inserted later in new messages.
To use the template, in a new message, click on the Insert Template button.
4.3 Setting Up Out of Office Messages
When you're away from your desk, set up an out-of-office status with personalised automated replies to inform senders of your unavailability. This feature works across all your associated email accounts directly within the Trident desktop app.
To set your Out of Office:
1. Log in to Zoho Mail.
2. Click the Settings icon.
3. Navigate to Out of Office.
4. Set the time frame (start and end) in which you need to send an Out of Office notification, and in what criteria.
Note that you can set separate messages to your colleagues (within your organisation) and the rest of the world (outside of your organisation)
4.4 Managing Email Signatures
Zoho Mail allows you to create multiple custom signatures and link them to different email addresses or aliases. You can include text, formatting, and images like your company logo.
To create a new signature:
1. Log in to Zoho Mail.
2. Click the Settings icon.
3. Go to Signatures and click the + icon.
4. Enter your signature details with preferred formatting and click Save.
In some organisations, the email signatures are controlled by the Administrator. Your name, email, the logo, and the contact details are taken from the organisation records such as Zoho Directory and Zoho People. In this case, you cannot create your own signature.
4.5 Outbox Delay
The Outbox delay feature allows you to set a small pause after clicking 'Send', giving you a window to catch and correct any mistakes before the email is actually sent to the recipient. Emails will temporarily reside in your Outbox folder during this delay.
To configure Outbox Delay:
1. Log in to Zoh Mail.
2. Click on the Settings icon.
3. Go to the Mail>Compose settings.
4. Locate the Outbox Delay section, check the box to enable it, and set the delay time. You can set between 1 minute and 120 minutes.
4.6 SecurePass for Confidential Emails
For highly confidential emails (e.g., pay slips, client details, contracts), SecurePass ensures enhanced security. While drafting an email, you can apply SecurePass and set an expiration date. The recipient will need a one-time password (OTP) sent via email to access it, and forwarding and printing can be restricted. Once the email expires, it can no longer be opened.
4.7 Requesting Read Receipts
If you need confirmation that an important email has been seen and read, you can request read receipts. This is particularly useful when communicating with recipients who may be travelling or in different time zones.
- Log in to Zoho Mail
- Click the Settingsicon.
- Go to Mail View Options.
- Locate Read Receipt.
- Select Always Send to always send a Read Receipt acknowledgment to the sender.
- Select Never Send to never send a Read Receipt acknowledgment to the sender.
- Select Ask me to ask for confirmation before sending a Read Receipt acknowledgment to the sender.
Chapter 5: Calendar and Meeting Management
Zoho Mail includes a comprehensive Calendar module to help you organise your schedule, create events, and manage meetings efficiently. The Trident desktop app further enhances this experience with a unified calendar.
5.1 Creating Calendar Invitations
You can schedule appointments and create events directly within the integrated Calendar, viewing and editing event details, and setting reminders.
• Unified Calendar: Access all your events from multiple calendars in one place, customising views and time zones to see your schedule alongside colleagues'.
• ICS Parsing: Quickly import event details from event invitations received in your email, blocking out your calendar with a single click.
• Appointment Scheduling: Share an appointment request form with others so they can request a suitable time to meet with you.
<<screenshot: Zoho Mail Calendar interface – showing event creation dialogue with fields for title, date, time, attendees, and location>>
5.2 Creating Calendar Invitations with Online Meetings
Zoho Mail seamlessly integrates with various online conference platforms, simplifying the process of scheduling virtual meetings.
• Integrated Platforms: Easily create or join virtual meetings using Zoho Meeting, MS Teams, or Zoom, with meeting links automatically generated and embedded in your invitations.
• Screen Sharing & Annotation: Host engaging audio and video meetings with screen-sharing capabilities. In Trident, you can even use annotation tools while sharing your screen for clearer discussions.
• Meeting Recordings: If someone can't attend, you can record meetings for them to catch up at their convenience.
• Resource Booking: For Mail Premium and Workplace Standard/Professional users, you can search for and book shared resources like meeting rooms in advance.
Chapter 6: Enhancing Productivity with Zoho Mail Tools
Zoho Mail is part of a broader suite of productivity applications, with integrated tools like Tasks, Notes, and Bookmarks to help you manage your work beyond email. The Trident desktop app brings these together for a unified experience.
6.1 Creating TODO Lists (Tasks)
The integrated Tasks module helps you effectively manage work for yourself and your team.
• Personal & Group Tasks: Assign tasks to yourself or to anyone on your team.
• Subtasks: Split larger tasks into smaller, manageable subtasks.
• Reminders: Stay on track with timely reminders and notifications for upcoming tasks and approaching due dates.
• Board View (Kanban): Track the progress of tasks visually to identify bottlenecks and over-commitments.
• Add Mail as Task: Transform emails into actionable tasks directly from within Zoho Mail.
6.2 Managing Notes
The Notes module provides a single place to jot down your ideas, thoughts, or scribbles, and you can add images or attachments.
• Richly Formatted Notes: Create notes with rich formatting, similar to a word processor.
• Group Notes: Share knowledge by creating group notes or sharing individual notes with colleagues for instant collaboration.
• Sticky Notes: Make certain notes 'sticky' so they are reminded to you when you open your mailbox.
• Add Mail as Note: Convert emails into actionable notes directly from your Zoho Mail inbox.
Note that the Notes in the Zoho Mail application are not the same as Zoho Notebook. If you are a Zoho One or Zoho Worplace subscriber, Zoho Notebook may provide a better experience.
6.3 Using Mail Bookmarks
Bookmarks allow you to access all your important reference pages directly from within your mailbox, keeping valuable resources at your fingertips. These bookmarks can be personal, or shared with others as well as groups or the entire organisation. The bookmarks are not linked to a browser, or a browser profile, but accessible directly from the mail client. From the supported browser, you can install the Zoho Mail Bookmark extension, which allows you to quickly save bookmarks into Zoho Mail Bookmarks.
Chapter 7: Zoho Extensions and Integrations
Zoho Mail thrives in a connected ecosystem, offering deep integrations with other Zoho applications and a growing list of third-party tools. This allows you to perform actions across different applications without leaving your inbox, reducing context switching and boosting overall productivity.
7.1 CRM Extensions (Zoho CRM)
If your business uses Zoho CRM, the integration with Zoho Mail is invaluable for sales and customer support teams.
• Manage Leads and Contacts: Create and manage Zoho CRM leads and contacts directly from your mailbox.
• Contextual Information: Get contextual information about your contacts and their deals right from your inbox.
• Synchronised Interactions: Email communications with clients are automatically logged into their profiles within Zoho CRM, providing a comprehensive overview of your engagements.
• Workflow Automation: Set triggers to automatically send emails based on actions taken in the CRM.

7.2 WorkDrive Extensions (Zoho WorkDrive)
Zoho WorkDrive is a secure cloud storage and collaboration platform for files. Its integration with Zoho Mail and the Trident app enhances file management and sharing.
• Access & Share Files: Add, access, and share files or attachments from WorkDrive directly within your mailbox.
• Secure Cloud Storage: Utilise WorkDrive's secure cloud storage, real-time editing, version control, and secure sharing features.
• Smart Flow (Trident): The Trident desktop app features "Smart Flow", which enables seamless drag-and-drop of files between your email attachments and WorkDrive folders. You can also share files from WorkDrive directly into Cliq chats or permit teammates to view WorkDrive files.
• Real-time Updates: Real-time editing in WorkDrive (via Trident) ensures accurate collaboration without version conflicts.
To integrate WorkDrive with Trident (if not already):
1. Navigate to Settings in Trident.
2. Go to Integrations and enable WorkDrive to seamlessly link it with the Widgets feature.
3. Alternatively, click the Widgets icon in the upper-right corner of Trident's main window, then select Add Widget to include WorkDrive.
7.3 Other Useful Integrations
Zoho Mail integrates with a wide range of other applications to cover various business needs:
• Accounting & Finance: Zoho Books, Zoho Inventory, Zoho Invoice, Zoho Expense.
• Automation: Zapier, Microsoft Power Automate, Make.
• Collaboration: Slack, Webex, Giphy.
• Customer Support: Zoho Desk, Salesforce, Zendesk.
• E-Signature: Zoho Sign, Adobe Sign, Docusign.
• Meeting & Calendar: Zoom, Google Calendar, Zoho Meeting.
• Project Management: Zoho Projects, Trello, Jira, Asana.
• Productivity: Zia (AI Assistant), Mail Merge, Zoho Notebook.
This extensive integration capability ensures that your inbox can act as a central hub for many of your daily business operations.
Chapter 8: Sharing Functions and Inbox Delegation
Collaboration is a key strength of Zoho Mail, offering features to share emails and folders, and enabling delegation for efficient team work.
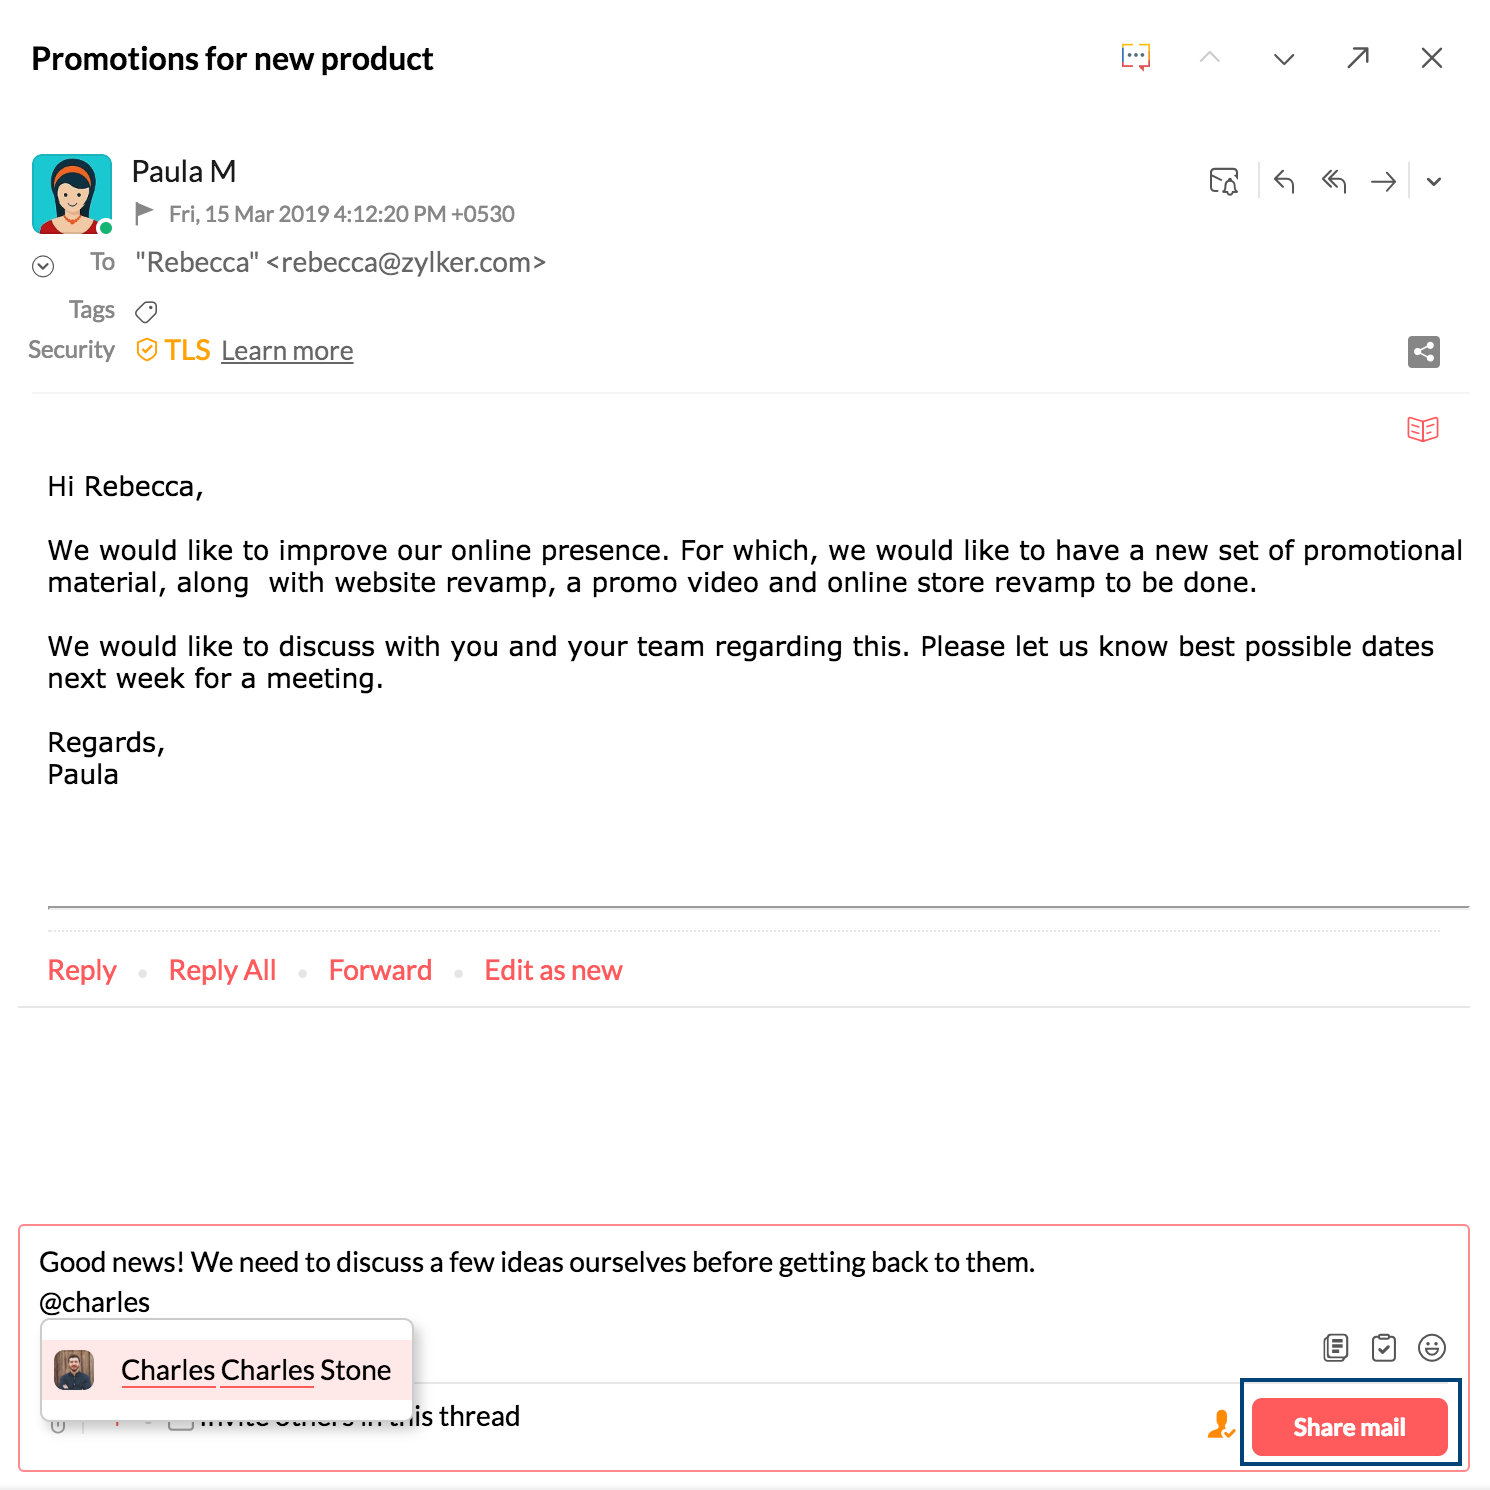
8.1 Sharing Emails and Folders
Zoho Mail allows you to share individual emails and even entire custom folders with other users or groups within your organisation. This is a powerful feature for team collaboration, enabling easy sharing of information and collective management of specific email categories.
To share an email:
1. Open the email you wish to share.
2. Look for a "Share" option within the email's menu or toolbar.
3. Select the recipient(s) (individual users or groups) within your organisation.
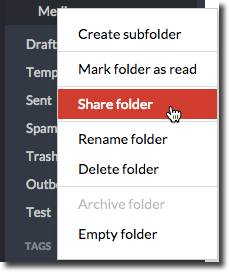
To share a folder with delegation:
1. Right-click on the custom folder you wish to share from the left pane.
2. Select the "Share Folder" or similar option.
3. Choose the organisation members you want to share it with and define their access permissions (e.g., read-only, read/write, delegate access).
8.2 Setting Up Inbox Delegation
Inbox Delegation allows users to work on behalf of other user. A common scenario is the personal assistant to the CEO reading and responding on behalf of the CEO.
To achieve a delegated inbox experience through folder sharing:
1. You would typically create specific folders (e.g., an "Inbox" equivalent, or project-specific folders) that contain the emails you want to delegate.
2. Follow the steps for "To share a folder with delegation" outlined above, ensuring you grant the appropriate access permissions to your delegate.
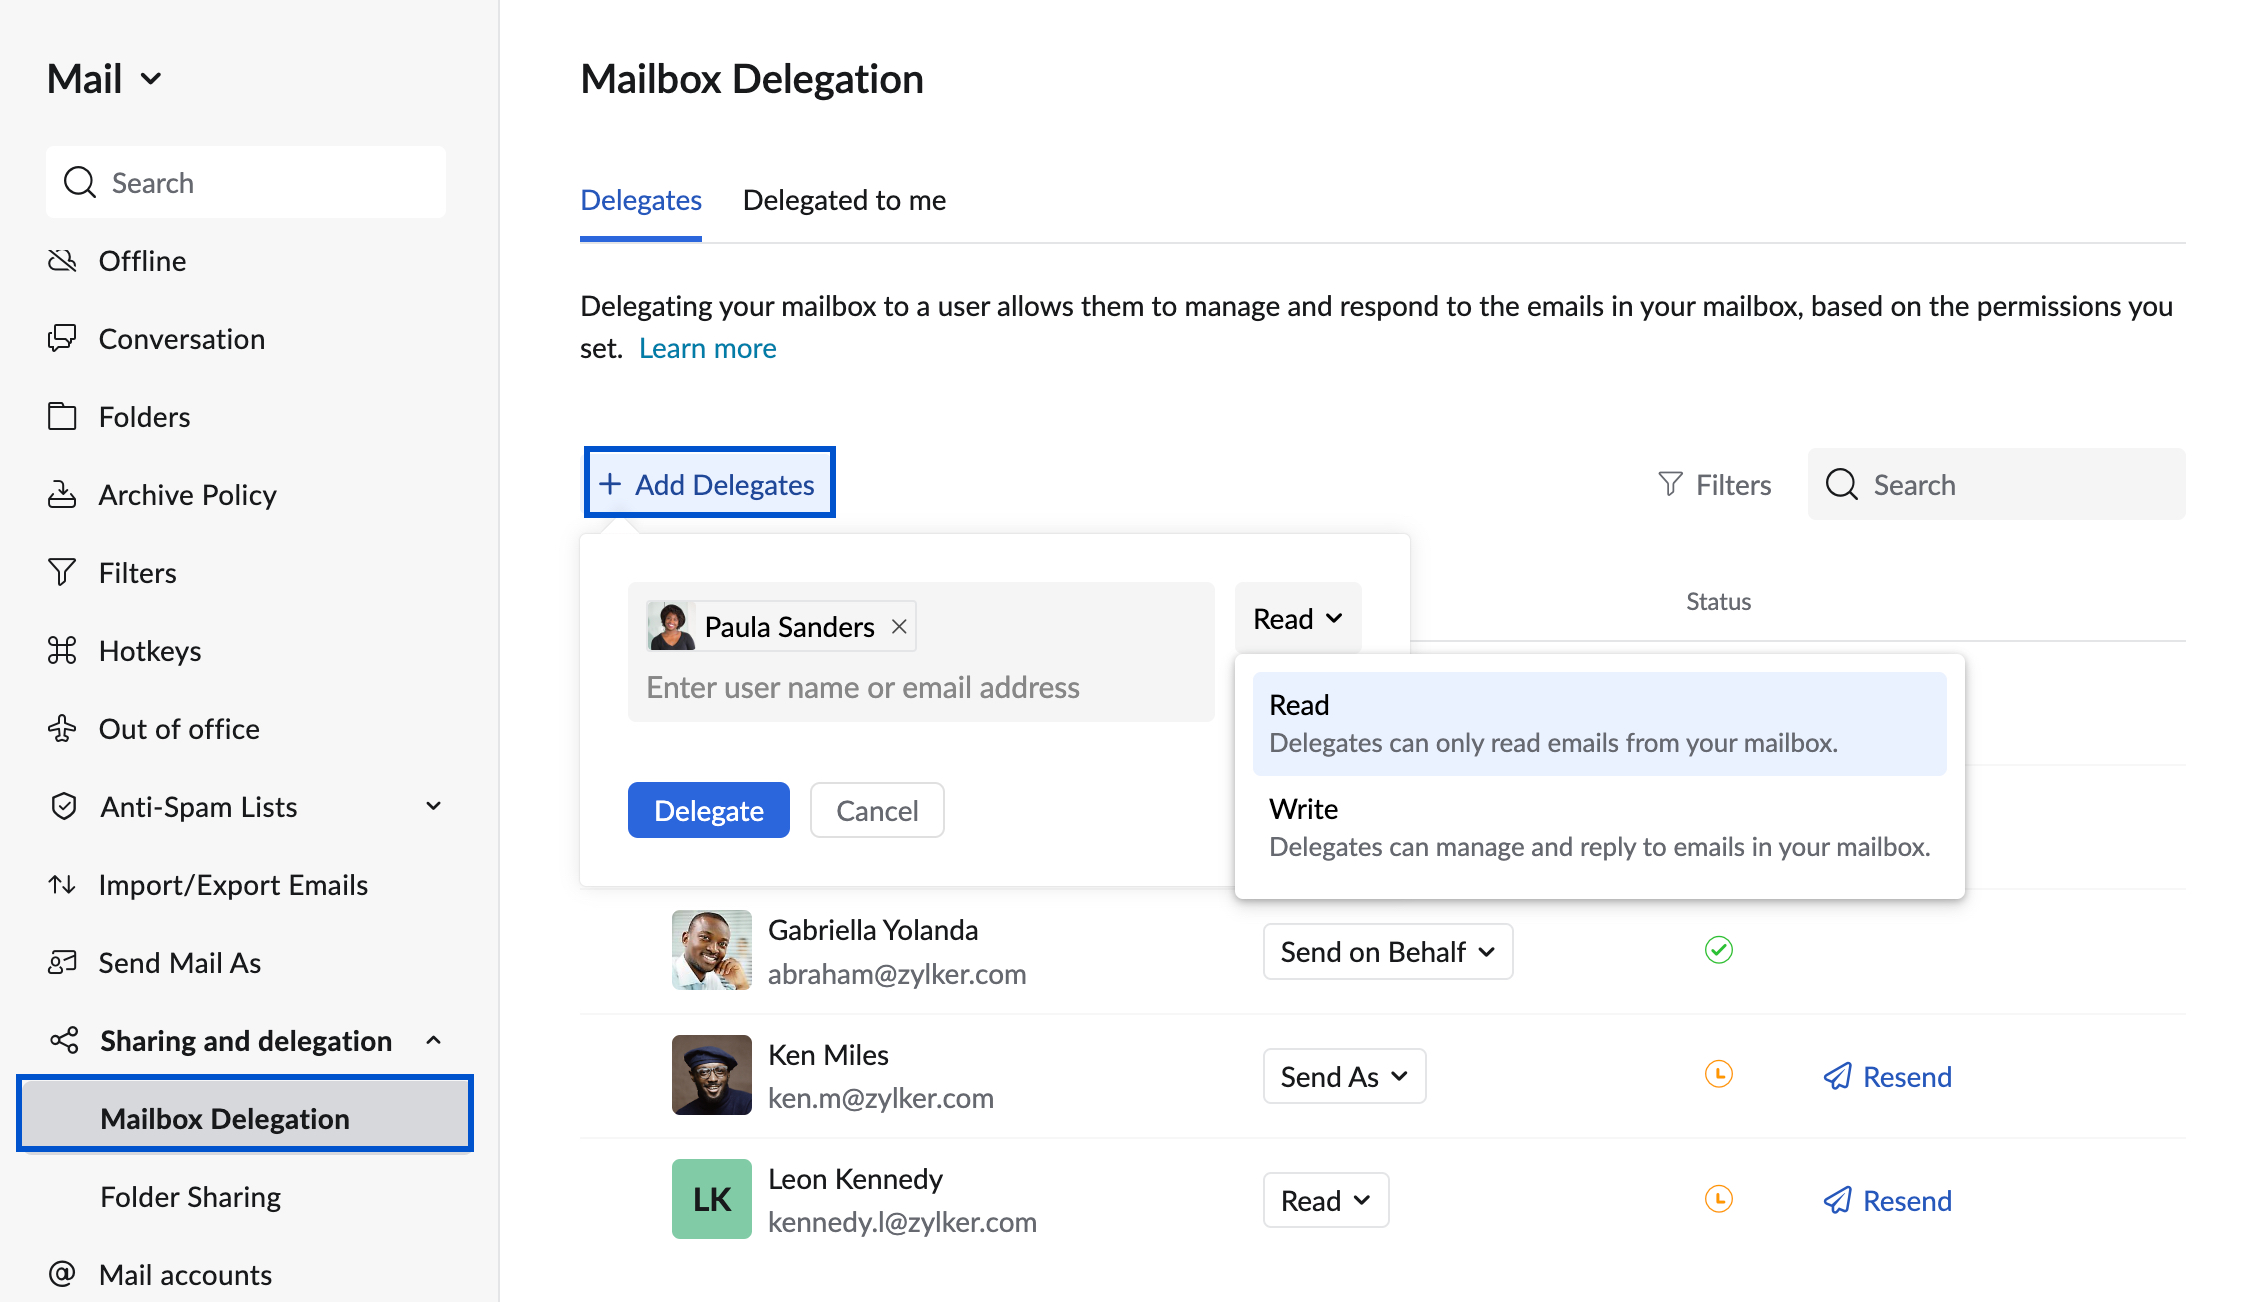
Note that there are two options in Write Delegation: Send On Behalf, and Send As.
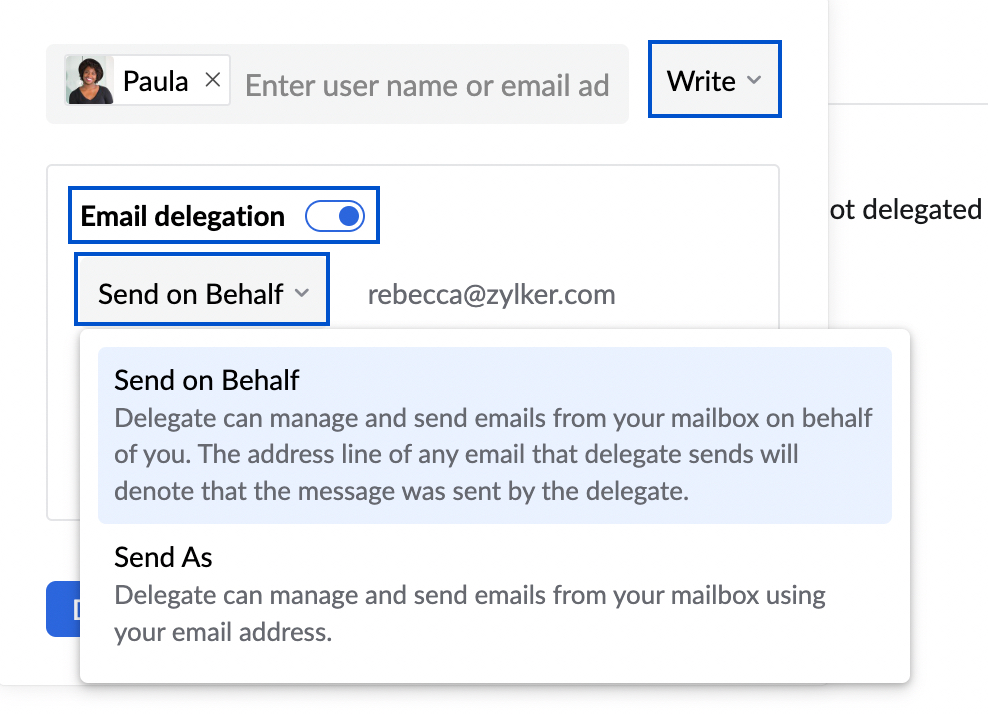
Send on Behalf will make it clear that the sender is different from the person the email seems to originate from, i.e. Send on Behalf of CEO by PA. In case of a Send As configuration, regardless of who sent the email, it will come from the owner of the delegated inbox.
This approach ensures that while a direct "inbox delegation" button might not be explicitly detailed, the underlying functionality to allow others to manage your mail is available through comprehensive folder sharing with delegation capabilities.
Related Articles
Zoho Mail Server and Office 365 Outlook - ActiveSync setup
THIS MAY NO LONGER BE AN OPTION IN THE LATEST VERSION OF OUTLOOK. I CAN RECOMMEND DOWNLOADING ZOHO MAIL DESKTOP LITE (https://www.zoho.com/mail/desktop) Settings on Zoho Mail server First, in the Zoho Mail server, we need to ensure ActiveSync is ...Zoho WorkDrive addon for Microsoft Office fails to install
In some cases, installing the WorkDrive addon for Microsoft Office fails to complete. You may receive the error VSTO Runtime not found. To remedy this error, you need to install the VSTO runtime from Microsoft first: ...How to set up spam control for Zoho Mail (beginners guide)
If you want to take control of the spam that comes into your inbox, this video is for you. There is no advanced "secret squirrel" settings here. This is aimed at the regular small business owner that manages the email server. The last bit of the ...Using Zoho Vault to Manage and Share Passwords Securely
Making the Most of Zoho Vault Zoho Vault is already part of your organisation’s Zoho setup and offers a secure, centralised way to manage and share passwords across your team. Why Use It? Secure storage for passwords, software keys, and confidential ...How to generate an App Password (for example - access Mail via IMAP in CRM or another Mail client)
When you have Multi-Factor Authentication (aka Two Factor Authentication) enabled, you cannot use your regular password to configure Zoho Mail to be accessible in other applications - you need to generate an App Password. To do this, navigate to ...